Interior architectural photography is a unique art form that demands a special set of skills. Capturing the perfect interior architectural shot requires an understanding of light, composition, and the right camera settings and lenses to achieve the desired result. Whether you are a professional photographer or just starting out, this article will provide you with the best camera settings and lenses for interior architectural photography. We'll show you how to choose the right equipment for your shoot, as well as tips and techniques to help you take stunning photos of interior architecture. Interior architectural photography requires a keen eye and technical knowledge in order to capture the perfect shot.
The camera settings and lenses you use can dramatically impact the outcome of your images. It is important to understand white balance, shutter speed, ISO, focal length, aperture and how they all work together in order to get the best results. White balance is an important setting for interior architectural photography as it helps to keep colors true to life. To ensure you achieve accurate colors, you should set your white balance according to the lighting conditions of your scene.
You can also adjust the white balance manually to suit your desired mood or look. Shutter speed is also key as it controls how quickly the shutter opens and closes. A slow shutter speed will allow more light into the lens and create a longer exposure, while a fast shutter speed will freeze movement in the scene. For interior architectural shots, you usually want a slower shutter speed, as this will help capture more details and prevent blur.
ISO is another factor that affects the quality of your images. A higher ISO will make your image brighter but will also introduce noise into the image. For interior architectural photography, it is best to keep your ISO as low as possible to prevent noise from ruining your shot. Focal length will also affect your image composition.
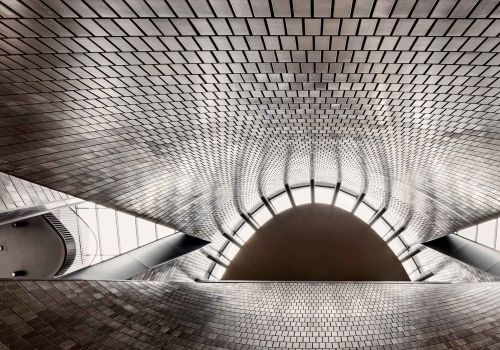
A wide-angle lens will allow you to capture a larger area while a telephoto lens will let you zoom in on distant subjects. For interior architectural shots, it’s best to use a wide-angle lens so you can capture the entire scene. Aperture is an important setting for controlling the depth of field in your shots. A wide aperture will give you a shallow depth of field and blur out the background, while a narrow aperture will give you a larger depth of field and keep the entire scene in focus.
For interior architectural photography, it is usually best to use a narrow aperture so you can keep all the details in focus. It is important to understand how all these settings interact with one another to get the best results for your interior architectural shots. The best advice is to experiment with different settings and see what works best for each situation. If you are shooting in changing light conditions, be sure to adjust your settings on the fly in order to capture the perfect shot.
Adjusting ISO
ISO is a setting on your camera that helps you control the brightness of the image. When shooting indoors, the light is often low, so setting the ISO to a higher number will help make the photo brighter. When shooting outdoors in sunny conditions, a lower ISO should be used to avoid overexposure. Generally, the higher the ISO, the more grainy the image will appear, so it is important to choose the right ISO for each situation.When shooting interior architectural photography, it is usually best to adjust the ISO manually, as auto settings can often lead to overexposure or underexposure. By manually adjusting the ISO, you can make sure that you are getting the exact level of brightness that you are looking for. It is also important to remember to adjust shutter speed and aperture in combination with ISO to get the desired effect. Overall, understanding how to adjust ISO is essential for achieving great interior architectural shots.
By using the right settings and manually adjusting them when necessary, you can get stunning images every time.
Selecting the Right Focal Length
Focal length is a key component in capturing the perfect interior architectural shot. It is the distance between the lens and the sensor of the camera, and it determines how much of the scene will be included in the final image. A longer focal length (such as a telephoto lens) will capture less of the scene but allow you to zoom in on details. A shorter focal length (such as a wide-angle lens) will capture more of the scene but can cause distortion around the edges.When shooting indoors, a wide-angle lens is usually best as it will capture more of the interior space in each shot. However, it’s important to consider how much of the space is visible and if any distortion will be created by using a wide-angle lens. In some cases, a longer focal length may be better for capturing more details and less distortion. Manually selecting a focal length for each shot is one option, but many modern cameras have auto settings that can be used to select the best focal length for each situation.
It’s important to understand how these auto settings work so you can get the most out of them when shooting indoors. In summary, understanding and selecting the right focal length for interior architectural photography is key to capturing the perfect shot. It’s important to consider the size of the space, how much of it you want to capture in each shot, and whether or not you want to use auto settings. With the right combination of knowledge and practice, you can master this important aspect of interior architectural photography.
Understanding White Balance
When photographing indoors, white balance is an important factor in creating the overall look of an image. White balance is a setting that helps ensure that white colors in the scene are accurately rendered. It can be manually adjusted or set to auto, but understanding how it works is key to getting the desired results. The concept of white balance comes from the fact that different light sources have different temperatures.Natural light, such as sunlight, has a higher temperature than artificial light, such as fluorescent lights. As a result, colors may appear differently under different light sources. White balance helps to balance out these differences by adjusting the color channels to make all white elements in the image appear white. Manually setting the white balance is a great way to get consistent results and make sure colors are accurately represented.
To do this, you will need to refer to your camera’s manual and select the appropriate setting for the type of light in the scene. If you are shooting in daylight, select the “Daylight” setting; if you are shooting under artificial lights, select “Fluorescent” or “Incandescent” settings. If you are unsure of the light source or do not have time to set the white balance manually, you can use the “Auto” settings on your camera. This will automatically adjust the white balance based on the type of light in the scene.
While it is not as precise as manually setting it, it is still a good option for quick results. By understanding and using white balance correctly, you can ensure that your images have accurate colors and achieve the desired look. Whether you decide to set it manually or use auto settings, having a basic understanding of how it works will help you get consistent results when photographing interior architectural scenes.
Controlling Aperture
Aperture is one of the most important settings to consider when shooting interior architectural photography. Aperture is measured in f-stops and determines how much light is allowed into the camera, as well as the depth of field. If the aperture is wide open, more light will enter the camera and the depth of field will be shallow.If the aperture is narrowed, less light will enter the camera and the depth of field will be deeper. When shooting indoors, it's important to choose an appropriate aperture that will allow enough light to capture the interior details while still keeping the background in focus. In general, you should shoot with a wide aperture (low f-stop) when photographing interior architecture, since this will allow more light to enter the camera and give you a shallow depth of field. This will help to keep the interior details sharp while blurring out any distracting background elements.
When choosing an aperture manually, make sure to check your camera's histogram to make sure you are not overexposing or underexposing your image. Additionally, if you are not comfortable manually setting your aperture, many cameras have an auto mode that can be used to automatically adjust your camera settings. In this mode, your camera will take into account the available light and select an appropriate aperture for the scene.
Choosing the Right Shutter Speed
Shutter speed is an important factor when it comes to interior architectural photography. It determines the amount of time the camera shutter is open, which in turn affects the amount of light that is allowed to enter the camera sensor.A faster shutter speed will result in a darker image, while a slower shutter speed will result in a brighter image. When photographing indoors, it is important to find the right balance between shutter speed and exposure, in order to capture the perfect shot. When setting your shutter speed manually, you should consider the available light and other environmental factors that may affect the exposure. A low light environment will require a slower shutter speed in order to allow enough light to enter the camera, while a bright environment will require a faster shutter speed to prevent overexposure. Additionally, you should also consider any movement in the scene, as a slower shutter speed will cause motion blur while a faster shutter speed will freeze any motion.
If you’re not comfortable manually setting your shutter speed, most cameras have an automatic mode which can be used to determine the optimal settings for each shot. However, it is still important to understand how shutter speed works and how it affects your photos, even if you’re using an auto mode. By understanding how shutter speed works, you can make adjustments as needed to get the best results from your camera. Interior architectural photography is a complex art form, but a rewarding one.
Taking the time to understand the fundamentals of camera settings and lenses can help you capture the perfect shot. White balance, shutter speed, ISO, focal length and aperture should all be taken into consideration when taking interior architectural shots. Different settings and lenses will yield different results, so it’s important to practice and experiment with different techniques to find your own style.